h1.post-title, .post h1 #Blog1 h1, #Blog2 h1 { font-size:1.5em; }
Tampilkan postingan dengan label Blogger widget. Tampilkan semua postingan

How to change blogger footer style

In this blog post I tell you about how to customize with blogger footer or how to change blogger footer style. If you want to make your blog good then you have to also change your blogger footer style or make multi task footer for your blog. Because if your blog look like good then many of visitor are engaged in your blog and you get more traffic. If your footer is keep with multi task and many links then you get good traffic for your blog and it also give a nice look to your blog.
Blogger footer

Every blogger wants to make their blog good and keep it best. So you have to change your blog footer so below I give you the process in which you will understand about make a good footer for your blog.

So first of all go your blogger account and sign in.


Then go to blogger Dashboard.
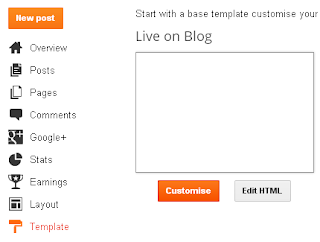
Dashboard of templates in blogger

Then go to Templates link in it.
 Blogger Dashboard

Click to customize link in templates.
Blogger template designer

Now Click to layout tab in the customize templates.

Now change the footer of your blog as per given in the above images.
Layout of blogger footer

Then click to apply to blog and click to back to blog. Now you can place links and many more things in your blogger footer.

Now enjoy this blogging.
Read more »»  

How to approve blog with Blog catalog

Blog catalog or BC is one of the best blogger communities in the world, which submit your blog in the web directory. In which you can read or write articles and discuss terms with another blogger. And it is also grow your blog traffic and useful for your blog SEO. But it is not easy to approve your blog in Blog Catalog. Because I must try it two times in which my blog is declined but when I try it third time then I get approved with Blog Catalog. So if you want to submit your blog in Blog Catalog then your blog must have followed the term and condition for better submission.
blog Catalog

And the Terms & Conditions are-


• You must verify your ownership for your blog- get the HTML code of any widget from Blog Catalog and paste it in your blog. And your blog must have Meta-Tags.

• Your blog must have at least 10 posts with unique content; Valuable contents or it is not a new blog.

• Your blog have not any pornography items.

• Writes your profile fully in Blog Catalog.

And if you have an Alexa rank than it is best for approving your blog with Blog Catalog. So if your blog follow all the above conditions then definitely your blog get approved.
But if your blog is declined first time then don’t worry about it just check your blog and submit your blog again.
Read more »»  

How to add feed burner animator widget to your blog

In this blog post I am telling you about how to add feed burner animator widget in your blog. Feed burner is shows your blog readers and subscribers and it are also increase your blog on SEO. It show five recent articles titles in this widget from your blog .The feed burner service is by Google and it is use to indexed your blog or site in search engines .I think this widget is a good widget for every blogger which is show up your post by animating titles. And it is also give good look to your blog. So let’s start to make this widget for your blog.
feedburner animator

If you haven’t account of feed burner than sign in with feed burner by your Google mail ID. And then type your blogger URL in this box ,and do all steps in it, and you can also click on the given link to read more about adding blog in feed burner. And finally you got feeds for your blog.

feed animator properties

Now click your blog in feeds and go to Publicize tab in it. Now ready to start attracting subscribers to your blog. Click to Headline Animator link in it.
feedburner animator

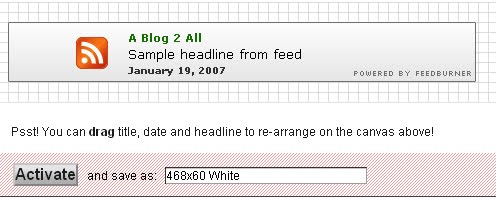
Now choose appropriate animator to your blog and click to activate link on below of the page.
feedburner headlines animator

Now choose blogger on the add drop down menu. And then click to next after that save this in your blog where you want to show it. And check your blog, if you do all things right than finally you got this but if not then recheck this post and read carefully.
Read more »»  

Labels and Tags cloud gadget for blogger

In this blog post I will tell you about how to show labels in your blog as your post. and labels is also a good gadget for blogger which is separate your post with their labels and it is also give nice look for your blog and you can also use it for tags cloud which is makes you a pro blogger so don’t wait for it. Now I tell you about how to make labels and tags cloud for your blog.
blogger labels

So go to blogger.com and sign in with your blogger account and then click to dashboard.

Now go to Layout tab in it and click to “Add a gadget”.

labels gadget for blogger

Now click to labels tab in it.
 configure labels of posts in blogger

Now click to labels or cloud in it and save it in your blog where you want to show it.
image of blogger labels

Now check your blog or preview your blog then you got a new gadget in your blogger page.
image of tags cloud in blogger
Now enjoy blogging.
Read more »»  

Twitter flying Bird widget for your blog

Twitter is a social networking site which has so many users in world. So in this blog post I tell you about a twitter flying bird widget for your blog. But before proceed this I want to tell you about it. Twitter flying bird is a widget for every blog and website; every blogger put this widget on their blog. And it also engaged your visitor on your blog, if anybody see this widget in your blog then he/she also want to put this widget on their blogs. So we can say this is a nice widget for blog. Let’s start to make this widget. Below I have given all the point which is use to making this widget.
twitter flying bird

First of all open your browser and sign in with your blogger profile, and then click to dashboard. Now click to templates tab on your blogger dashboard and then click to HTML JavaScript.


Now click on expend the blogger template on top of HTML JavaScript, and find </body> tab by press CTRL+F. and copy the below given code and paste it before closing the </body> tab. And write your twitter id there and after all this save your settings and check your blog, now you find there a flying twitter bird and enjoy this widget.

<script src='http://bloggerblogwidgets.googlecode.com/files/way2blogging.org-tripleflap.js' type='text/javascript'>
</script>
<script type='text/javascript'>
var twitterAccount = &quot;write your twitter id here&quot;;
var tweetThisText = &quot; <data:blog.pageTitle/> : <data:blog.url/> &quot;;
tripleflapInit();
</script>
Read more »»  

Related post widget for your blog

Related post widget for your blog
“Related post widget” or “you may also like” widget for you blogger. It is a blog widget that appears under each post, and gives link to your all post. It is also very interested widget for blogger, because it gives a nice look to your blog or your blog gets a new look as a pro blogger. This widget link to stories that are more interesting to readers of a particular post and keep them engaged with your blog, so we can say it is a good widget. And one more interesting thing, it also increase your blogger traffic. And it is easy to use and easy to adding in your blog. And it is a free widget for blogger. So let’s start to add this widget in your blog and give a nice look to your blog.
related post widget for blogger and websites


First of all Sign in to your blog and click to dashboard.

Now open a new tab and type “Linkwithin.com” in your browser web address bar and press enter. Now you get this website.
about the related post widget

Then type you email in it and type you blog link or URL there. Select blogger in platform tab drop down menu and select how many stories you want see in your blog.

And the last thing click to get widget and click to next on another page, after that it is attached with your blog.
Read more »»  

Flag counter widget for blogger

Flag counter widget is showing yours all visitor from many countries. And it is collected visitors country flag in your blog from all over world. So today I tell you about how to put this widget in your blog. Because it is a good widget and tells you about your visitor and it’s also make your site interesting. So let’s start to put this widget in your blog.
visitors flag counter


First of all Go to your blogger and sign into your blog.
create a flag counter for site or blog

Then go to a site name is flagcounter.com, after that customize your flag chart like how many flags you want to show on this widget and if you want to change color of the widget then change it.
copy the URL of flag counter for your blog

After customize click to “Get your flag counter”. Now check the code for websites and copy this code. Then go to your blogger and click to dashboard and then go to layout in your blog, and click to add new widget and select HTML JavaScript. And paste this code on it, and save it where you want to show it and save arrangement.

Now save your all setting and enjoy this widget.
Read more »»